Posts

Exhaust and Front Brakes

Image
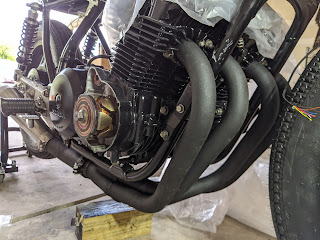
  DHL/USPS finally found my parts!  I had been waiting for over two months, so obviously I was stoked to get them.  I was working on valve shim adjustment and carb tuning when they showed up and immediately got pushed to the front of the line.  I went with MAC headers and an Italian made Spark Performance muffler.  This combo seemed to be the go-to for high end CB750 cafe builds.  The headers were a little hard to find as all of their distributors were out of stock, maybe due to COVID supply chain issues, but I was able to find a full exhaust set on eBay.  I cut the included muffler off of the link pipe.  I'll just sell the MAC muffler that came with it. As you can maybe tell from the scratched up frame, installing the headers wasn't as simple as I had hoped.  The MAC installation instructions told me to use the wrong exhaust clips that pushed the exhaust flanges into the frame.  Welp, this is why I chose to paint it; "easy" t...

Finished Tank and Electrical Install

Image
Sandblasted | 180 Grit | 1000 Grit After lots and lots and lots of sanding and some clear coat, I finished the tank and cowl.   I decided to go with the raw steel look despite the brass plug and the minor dents, it gives it character, or something like that... I wanted a semi polished brushed finished, which means lots of directional sanding to get the right 'brushed' orientation.  I took it to Ben's V-Twins where Ben generously let me use his sandblaster to blast the remaining paint off the tank and get a uniform surface. I wet sanded with a mix of water and WD-40 starting with 180 grit. I went to 320, 400 and stopped at 1000.  I left the underside with a sandblasted finish.  Sanding and cleaning the tank revealed quite a bit more minor surface flaws from the manufacturing process that I didn't notice when it was rough and dirty (++character).  After sanding I cleaned it thoroughly with acetone and compressed air.  Then I put on 3 coats of Ru...

Engine Install and Electrical Schematic

Image
Sandblasted the frame, swing arm, steering column and some other things.  The blaster was acting up so it didn't turn out perfect but it got most of the paint and rust off, and most importantly was  free .  The metal information badges were carefully removed.  We grinded off a couple more unnecessary brackets, welded up some rust holes and smoothed the frame out.  The rear brake switch was visible from the side profile of the bike so the switch bracket was cut off and welded in line with a frame tube removing it from sight.  The steering bearing races were punched out and the lower bearing was removed (forcefully) from the steering column.   I debated whether to powder coat or paint the frame.  Powder coating would be a little more robust but I would need to send it out ($$$) and wait.  I felt pretty confident that if I took my time and did it properly that paint could look great.  I was more swayed by the fact that I had...

Engine Rebuild and Parts Update Pt. 3

Image
Engine Cylinder Head I got the engine cylinder head back from glass beading and a full valve job.  It's unfortunately no longer a metal hotel for setting up dirt dauber nests.  Then I primed and painted it to match the rest of the engine.  New exhaust gaskets make great paint masking plugs when you tape them up.  Threw on a new gasket and installed the cylinder head with the oil pipe.  Then I started the nerve racking experience of installing the cam shafts and setting the timing.   Not Today Satan! You know its scary when the engine bible repeatedly tells you "very expensive damage" can occur.  Seriously; it warns you after almost every step of the process. I installed the exhaust cam, set the mechanical timing and torqued down the annoying-to-get-to cam sprocket.  Things were going suspiciously smooth up until I snapped a bolt off into the engine trying to torque the cam holder bolts... son-of-a... welp.  Nothing like...

Front End and Rear Brakes

Image
That didn't last long...I couldn't help but get more parts during quarantine. Modified the fork top bridge to make it look more intentional/stock.  Usually on these builds I see people leave the handle bar clamp mounts and instrument cluster mounts on.  I cut off the right side cluster mount and opened the left one up to fit the choke.  I cut off and sanded down the clamp mounts and retapped the holes deeper.  I plan on making some black elliptical shaped badges to bolt onto those new flats.  This is a focal point of the cockpit so I wanted to do something a little different with the finish.  I sandblasted the bridge and plan to leave it like this, although I might anodize/dye it a little darker.  It's really starting to look like a thing.  Just need to mount the motor and I could lie and tell you it was finished; ready as it needs to be for Instagram right?...I wanted to give the stock controls a shot before replacing them (expensiv...