Exhaust and Front Brakes
DHL/USPS finally found my parts! I had been waiting for over two months, so obviously I was stoked to get them. I was working on valve shim adjustment and carb tuning when they showed up and immediately got pushed to the front of the line. I went with MAC headers and an Italian made Spark Performance muffler. This combo seemed to be the go-to for high end CB750 cafe builds. The headers were a little hard to find as all of their distributors were out of stock, maybe due to COVID supply chain issues, but I was able to find a full exhaust set on eBay. I cut the included muffler off of the link pipe. I'll just sell the MAC muffler that came with it.
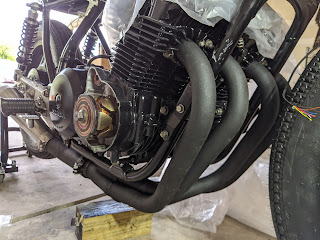
As you can maybe tell from the scratched up frame, installing the headers wasn't as simple as I had hoped. The MAC installation instructions told me to use the wrong exhaust clips that pushed the exhaust flanges into the frame. Welp, this is why I chose to paint it; "easy" touch ups. After some yelling and some comparing the old clips to the new ones, I got the headers installed. Luckily the muffler fit nicely on the MAC link pipe letting the muffler sit right where I wanted it to. It tucks neatly under the frame and then it emerges following the angle of the bottom of the rear set.


I took apart the crusty front brake calipers to paint them. After my last exciting experience with motorcycle brakes I decided to fully rebuild them as well. Scrapped all the crud off and cleaned them with brake cleaner. I sanded off all the loose paint in preparation. I then sprayed the parts with VHT high temp primer and satin black caliper paint. I wanted to bake them, but we just got a new stove in the kitchen, so it probably isn't the best time...so I left them outside in the 90 degree heat all day.


I rebuilt them with kits from Randakks. I had to cut off a burr that looks like it didn't get removed from the manufacturing process that was interfering with the pins and the boots. They are a bit finicky to reassemble once you compress the piston because the bottom pad relies on pressure from the rotor to stay in. The person I got them from must have changed out the bolts to allen heads which was pretty nice. When mounted they are a little tight against the rotor; ill have to readjust the distance from the fork mount. They look great repainted and installed. Now they are ready for some fresh brake fluid.
 |
| Test Fit: Looks pretty sweet like this, I should leave it right? |


I was pretty happy to get the rest of my parts. I now have everything to get it finished. I am going to get the engine top back on and then it will be time to get into the wiring. I researched and ordered the jets I need for the carbs to run POD filters and the new exhaust. Ill be cleaning and rebuilding the carbs as well. Its looking so good, its becoming harder to not spoil it...


Slt, je voulais savoir si tu as juste acheté le collecteur ou s'il a fallu un morceau plus long pour rallonger afin de pouvoir installer la sortie. J'ai egalement un cb 750 et je souhaiterai passer sur un collecteur 4 en 1. Merci
ReplyDelete