Front End and Rear Brakes
That didn't last long...I couldn't help but get more parts during quarantine.
 Modified the fork top bridge to make it look more intentional/stock. Usually on these builds I see people leave the handle bar clamp mounts and instrument cluster mounts on. I cut off the right side cluster mount and opened the left one up to fit the choke. I cut off and sanded down the clamp mounts and retapped the holes deeper. I plan on making some black elliptical shaped badges to bolt onto those new flats. This is a focal point of the cockpit so I wanted to do something a little different with the finish. I sandblasted the bridge and plan to leave it like this, although I might anodize/dye it a little darker.


It's really starting to look like a thing. Just need to mount the motor and I could lie and tell you it was finished; ready as it needs to be for Instagram right?...I wanted to give the stock controls a shot before replacing them (expensive for decent lever assemblies); clutch assembly from the base 1981 CB750K and brake/master cylinder assembly from the 1980 CB750F brake system I bought. I sanded down smooth the ridges and sides on the fluid reso and cut off the mirror mount on the clutch bracket. Sanded everything smooth then painted them satin black. Before the end I might fill in with bondo and smooth out the fill-line indent in the fluid reso as it kind of looks weird, so well see. Bought genuine Honda CB750 grips and cut the flanges off, making them look like black light saber handles. Bought a slimmer metal headlight casing but used the stock headlight fixing it to the forks with some Ebay brackets. Also decided to replace the steering bearings, mainly because one is missing entirely.
 Still waiting on a couple parts to finish up the front end controls. I went with bar end turn signals and sleek buttons from Motogadget. I also went with Motogadget's motoscope tiny as the only gauge on the bike. It looks like just one analog gauge but on this little gauge it displays: speed, neutral light, oil pressure light, high beam indicator, turn signal indicator and distance traveled; everything but engine RPMs, but hearing and feel make up for that when riding. I will need to make a small bracket to mount it to the bridge.
 Finished up my plan for making the rear drum brakes work with the rear sets designed for disc brakes, sort of like a downgrade kit... Using the Bol d'Or brake lever and the base bike's ...looking up the part name... brake spindle and the spring stopper bracket I setup the spring to pull the spindle back when the brake pedal is released. The spring is anchored to the rearset via the mounted spring stopper with a hole drilled in it. Some black paint and you wont notice the mechanism. I will move the brake light switch mount in line with the frame so you cant see it. I will also add a stop bracket so you can set the brake lever height. Since the drum brake engages either way you move the engagement lever, I moved the tie rod above the swing arm for a cleaner look. Once I shorten the tie rod the rear brake modifications will be complete. You'll also notice I removed the protruding triangular piece used for the rear disc brakes (I don't have) from the rear sets. I will sand it flush and plug weld the counter sink to make it again look intentional/stock.
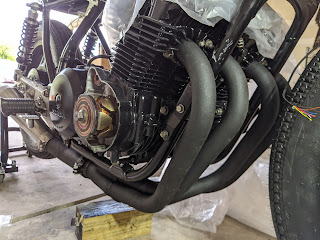
Hopefully I can get back to finishing up the motor soon. I have everything to rebuild the carbs but I don't really want to start messing with those until I have the motor reinstalled. I'll probably start on the preliminary wiring next. We're so close!...I think.


It's really starting to look like a thing. Just need to mount the motor and I could lie and tell you it was finished; ready as it needs to be for Instagram right?...I wanted to give the stock controls a shot before replacing them (expensive for decent lever assemblies); clutch assembly from the base 1981 CB750K and brake/master cylinder assembly from the 1980 CB750F brake system I bought. I sanded down smooth the ridges and sides on the fluid reso and cut off the mirror mount on the clutch bracket. Sanded everything smooth then painted them satin black. Before the end I might fill in with bondo and smooth out the fill-line indent in the fluid reso as it kind of looks weird, so well see. Bought genuine Honda CB750 grips and cut the flanges off, making them look like black light saber handles. Bought a slimmer metal headlight casing but used the stock headlight fixing it to the forks with some Ebay brackets. Also decided to replace the steering bearings, mainly because one is missing entirely.
Still waiting on a couple parts to finish up the front end controls. I went with bar end turn signals and sleek buttons from Motogadget. I also went with Motogadget's motoscope tiny as the only gauge on the bike. It looks like just one analog gauge but on this little gauge it displays: speed, neutral light, oil pressure light, high beam indicator, turn signal indicator and distance traveled; everything but engine RPMs, but hearing and feel make up for that when riding. I will need to make a small bracket to mount it to the bridge.
Hopefully I can get back to finishing up the motor soon. I have everything to rebuild the carbs but I don't really want to start messing with those until I have the motor reinstalled. I'll probably start on the preliminary wiring next. We're so close!...I think.


Comments
Post a Comment