Engine Install and Electrical Schematic

Sandblasted the frame, swing arm, steering column and some other things. The blaster was acting up so it didn't turn out perfect but it got most of the paint and rust off, and most importantly was free. The metal information badges were carefully removed. We grinded off a couple more unnecessary brackets, welded up some rust holes and smoothed the frame out. The rear brake switch was visible from the side profile of the bike so the switch bracket was cut off and welded in line with a frame tube removing it from sight. The steering bearing races were punched out and the lower bearing was removed (forcefully) from the steering column.
I debated whether to powder coat or paint the frame. Powder coating would be a little more robust but I would need to send it out ($$$) and wait. I felt pretty confident that if I took my time and did it properly that paint could look great. I was more swayed by the fact that I had the means to repair any scratches/flakes caused from assembly and riding. I started by power washing the pieces and spraying them down with Dual-Etch metal conditioner by Sherwin Williams. After etching I power washed them again and blew them dry with compressed air. I had to get primer on there fast because it takes all of a couple seconds for the entire surface to turn bronze from rust after cleaning/etching. I used SEM self etching primer and Promax semi-gloss black paint, a combination used regularly in the NASCAR industry.


Frame Bare, Primed and Painted
Check out that sweet paint frame I built to keep the bike frame off the ground using spare 2x4s and metal wire from yard flags. Never.Throw.Anything.Away. I go over the paint frame build in my new paint frame build blog...jk figure it out yourself. I used two coats of primer and three coats of paint. The primer and paint laid down really smooth. It certainly isn't perfect with the 40 years of barn rust that ate into the frame making some of the surfaces rough; but the paint smoothed it over well making me pretty happy with how it turned out. With the frame painted, it was time to start putting things back together! I threw new bearing races and the steering column in the freezer to make installation a little easier. I didn't document how to install those, but it includes a hammer, a block of wood, a lot of packing grease, my car jack lever and patience. With the steering bearings installed it was time to install...

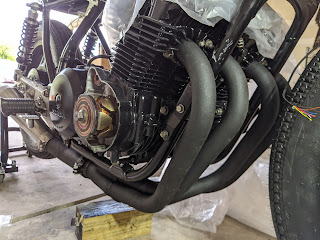
...the engine!!! With the small lift and the removable piece of the frame, getting the engine in there was pretty painless with the help of a friend. I left the oil pan off the bottom of the engine to leave a flat surface for the engine to sit on. It will go back on easily once the bike is back on its wheels/on a lift. I just need to check shim clearance and adjust if necessary, then the head top can go back on and I can stop collecting dust inside the engine (I keep it covered when I can, but that only works so well). This is getting me really excited to see it all back together, but then comes the scary make-it-work-again part.

I finally put together the wiring schematic of the bike including the m-unit, m-buttons and motoscope tiny. I know you might not be able to see it perfectly, but I just wanted to prove I did it! I laid it out in the same way the components would be laid out physically on the bike to get a better feel for what lines need to be run. I may throw some inline fuses to protect the m-unit and motoscope. The aux 1 output powers the gauge and the aux 2 output is the switched power for the reg/rec. I am replacing the regulator/rectifier with a Rick's reg/rec suitable for lithium ion batteries protecting them from overcharging. The ignition coils were cracked so I replaced those. I need to make a couple more connections and some changes before I am finished. As drawn, it would only start if I hold the clutch in, even in neutral. I would have to install a diode connecting the clutch switch to the neutral indicator for it to be able to start in neutral, like it is stock. It is questionable safer to make sure it only starts with the clutch in. I will be sure to upload this diagram with the parts list at the end of the build.


Battery Box Fabrication
 |
| Installed Battery Box Side View |
I measured the dimensions of the battery and drew up a battery box. I wanted to cover the battery in case anything drips onto it so I designed the box a little deeper and a lid attached with a welded hinge and two bolts on the lip. I cut it out of 16 gauge steel sheet metal and scored it to bend with the angle grinder. I bent it up in my garage and my dad welded the corners and hinge. The top is lined with teflon to isolate the box from the terminals and compression foam to hold the battery securely. The box attaches to the frame via two studs welded to the box that run through a bracket welded to the bottom of the frame. The box has to come off to be able to insert/remove the battery (anti-theft!). Once the chain is on you won't be able to notice it on the left side. On the right side of the bike it is completely hidden by the exhaust and muffler.
Next I need to sand, polish and clear coat the tank and cowl. I've decided I am okay with the brass plug being visible; its actually quite hard to even notice. The carbs also need to be rebuilt and synced as well. The only kits I trust for that come from Ranakk's Cycle Shakk. I need to research what jet sizes work for the POD filters and the new exhaust so I can install those during the rebuild. Soon it will be time to start mounting the electrical components and think through wiring it together. I need to make a bracket for the motoscope tiny to attach it to the bridge top as well. Those are the main sections left, everything else are little odds and ends. I'll be riding before long.
You thought I was just gonna leave without teasing you with a final mock up? Hah! Since it more or less *looks* finished, I won't be sharing many full bike pictures until the end just so I don't completely spoil it. So until then, enjoy this.


Comments
Post a Comment