Posts

Frame Fabrication and Mock Up

Image
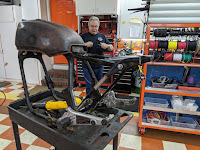
I've partially recovered from surgery and things are back to normal again! sike. COVID-19 is here.  I sense plenty of time to work on the bike coming up, so I will use it; much like this previous weekend.  All of the events my wife and I had to do were canceled so we took the frame to my dad's house and did the seat and cowl frame fabrication. I decided on this build since its a first that I didn't want to throw major body work fabrication into the mix so I can focus mainly on the essentials and bike building basics (the bbbs if you will).  I also didn't want to sacrifice my vision either, so I needed to find exactly what I had pictured in my head.  Luckily Hookie Co. directly sells the seat and cowl they use for their builds.  The seat was low profile and followed the frame's shape and the cowl beautifully extended the contours of the tank and purposely integrated the tail light without needing to recess it into the frame hoop like many other builds.  ...

Engine Rebuild and Parts Update Pt. 2

Image
Wanted to post once more before I leave for Germany and then come back and have surgery to then go dark for 2 months. I got all but the cylinder head cleaned up and painted, including the anger-purchase oil pan.  I used VHT high heat engine primer and enamel.  After painting it I started to like the all black stealthy look so I decided to not polish the fins which was the initial plan.  The effect is very minimal and I can always do it later if id like.  I still have to clean and polish the points cover and the alternator cover as I will be leaving those unpainted.  I imagine I will have to repaint the "Honda" lettering on the points cover after cleaning it.  The alternator cover is a little scraped so I might replace that depending on how it turns out.  Replaced all the gaskets and o-rings with the complete rebuild kit from Randakks Cycle Shakk; a littleeee pricey but easily justifiable knowing they will be right.  For the CB750 they are the ...

Engine Rebuild and Parts Update

Image
There she is, the cylinder block and crankcase (the hardest parts to clean and mask) all stripped, cleaned and painted.  I'm telling you, there is something therapeutic about cleaning up a 40 year old motorcycle engine.  Getting brake fluid in my eye and scrubbing those gaskets off every mating surface is very comparable to hardships in life like whe..SIKE I'm not gonna do that to you.   Each one of those gaskets turned into something harder than metal; testing my patience, taunting me to bring the steel brush wheel to it at 1 million rpm BUT I DIDN'T.  At one point I literally threw the oil pan in the trash and bought a clean one from ebay.  The rebuild I don't mind, but next time I'm dropping this thing off to get vapor blasted and painted.  All in all, I'm pretty happy with how it looks.  Next I'm going to be polishing the fins on the cylinder block and then getting it back on the crankcase.   My goal is to get the engine mostly reassembled...

Engine Tear Down and Rear Sets

Image
Stripped Frame and Pulled Engine  Stripping it down to the frame turned out to be the right call because a lot of the frame modifications would have been impossible without having complete access to it.  It was surprisingly easier than I thought it would be; nothing was seized or stripped.  The side of the frame even comes right off to let the motor slip out, which im sure would make my wife happy after she reads this because I would have asked her to help me.  The immediate plan is to inspect, clean, paint and rebuild the engine.  After studying the DOHC (dual overhead cam) motor bible and watching some youtube vidoes, I started disassembling the motor. Engine Tear Down It seems overwhelming at first but if you take your time and stay organized it really isn't a big deal.  At first I was just going to clean it and replace the gaskets, but when I told my dad (frequent engine rebuilder) this plan, it was as if I told him I murdered someo...

1981 Honda CB750K Build Plan (Updated 7/7/20)

Image
Scroll to the bottom for the build plan.   Barn Bike: 1981 Honda CB750K I found a great deal on a barn find 1981 CB750K.  It was completely stock, some pieces damaged but nothing was missing; most importantly, the tank wasn't dented.  Surprisingly, the bike started right up with some starter fluid and the choke open; this was a great sign.  Wes, like the trusty motorcycle friend he is, set off with me to snatch this bike up.  The old guy letting it go was amazing.  He wanted to restore it but just didn't have the time or energy to put into, luckily I do.  Along with the bike he gave me tank restoration chemicals, a complete engine rebuild manual and all the parts he bought for it.  For craigslist deals it was pretty ideal.  Once I got it home I quickly stripped the fenders, turn signals and side covers to get a quick glimpse of a cafeish CB750.  I had always wanted to see my other bike like this but never want...

Story so far...

Image
Welcome to my cafe racer research/ebay scouring/build project blog.  I am going to be detailing my cafe racer build as I modify a 1981 Honda CB750K into a lightweight stripped down sport bike.  The build theme for this bike is "If Honda designed a cafe racer using the 79'-82' CB750K base."  Skip to the next post to get into the build.  The story so far... I've always wanted to build a cafe racer, but I really didn't know the first thing about them, let alone motorcycles in general.  After searching through many cafe builds, my favorite of them being Japanese base bikes and BMWs, I finally found a picture of a cafe build that sold me on finally doing it.  Hookie Co. 1981 Honda CB750K(Z) Hookie Co.'s numerous cafe racer builds were just about perfect in my eyes.  The lowered suspension, the completely stripped frame leaving only the necessities visible (especially the entirely empty triangle behind the motor), the large ...