Frame Fabrication and Mock Up
I decided on this build since its a first that I didn't want to throw major body work fabrication into the mix so I can focus mainly on the essentials and bike building basics (the bbbs if you will). I also didn't want to sacrifice my vision either, so I needed to find exactly what I had pictured in my head. Luckily Hookie Co. directly sells the seat and cowl they use for their builds. The seat was low profile and followed the frame's shape and the cowl beautifully extended the contours of the tank and purposely integrated the tail light without needing to recess it into the frame hoop like many other builds. They are not direct bolt-ons so it required a bit of fabrication to make them work.


Frame Modification for Cowl


We (Master fabricator/engine rebuilder/fellow visionary/dad and I) cut off the existing rear end of the frame tubes about 1/2in from the stock sissy bar mounts. As i've mentioned I want this to look intentional, much like "this is how it would come stock" so we left about 1in of the U channel past the cut off point so that the hoop could fit in seamlessly. The frame hoop was too wide and in absence of a wide enough vise we (he) broke out the ole acetylene oxygen torch and 'influenced' the metal. The joining tubes were welded and grinded flush and the factory weld lines were extended and left alone. Then the cowl was placed in position so that we could weld tabs onto the frame aligning with the mounting inserts on the cowl.

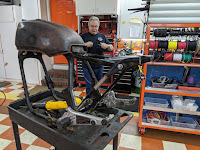
For the seat we welded two slotted washers onto the two open holes on the top of the frame. The holes roughly aligned with the two threaded inserts in the bottom of the seat. The slots allowed for the right positioning of the seat. Then I cut down the rubber mount and swapped out to low profile hardware on the tank mount so that it would let the seat sit flush against the frame and angle the tank down aligning the sight line of the tank. Only the large side view picture of the mock up shows this, on the other pictures you can see the seat gap in the front and the tank slightly angled up, as per stock.

I'm pretty excited for how this first mock up turned out. These are all the parts I needed to add to the bike to really give it that cafe characteristic. I was hoping to have the rear shocks from YSS in for this but they are still on their way. During this inevitable quarantine I will be reseating and rebuilding the valves and painting and reassembling the top end of the engine. Stay tuned.


Comments
Post a Comment