Wanted to post once more before I leave for Germany and then come back and have surgery to then go dark for 2 months.

I got all but the cylinder head cleaned up and painted, including the anger-purchase oil pan. I used VHT high heat engine primer and enamel. After painting it I started to like the all black stealthy look so I decided to not polish the fins which was the initial plan. The effect is very minimal and I can always do it later if id like. I still have to clean and polish the points cover and the alternator cover as I will be leaving those unpainted. I imagine I will have to repaint the "Honda" lettering on the points cover after cleaning it. The alternator cover is a little scraped so I might replace that depending on how it turns out. Replaced all the gaskets and o-rings with the complete rebuild kit from Randakks Cycle Shakk; a littleeee pricey but easily justifiable knowing they will be right. For the CB750 they are the guys to go to. I did the piston rings and will be doing the carb rebuild from them as well.
 |
| Pistons Installed before Cylinders |
Cleaned up the bolts and put the clutch cover, left side crankcase cover, oil pump, oil cover and starter back on before the cylinders. Leaving the oil pan till last because the flat bottom makes it super easy to work on. Took the cylinders to my dad's place to have them honed and installed. Big thanks to my dad for helping me out; I seriously don't know anyone who could do it better. Replaced the piston rings and checked fitment. The fit was still well within spec so there was no reason to open them up, except RACECAR. Already hurt myself on the 750, I don't need any more power for right now... Luckily the extreme taper on the cylinders allows you to put the pistons back on the connecting rods before you put the cylinder body on. With the help of a simple alignment jig (small pieces of wood) you can drop the cylinders right on top of the pistons and slide it all the way down with little trouble. Have a couple paint touch ups to do once its fully assembled but ain't she purty? Currently have the cylinder head on the bench, cleaning up and probably rebuilding the valves; then the bulk of the engine rebuild will be finished.
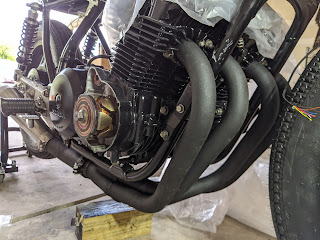
 |
| Completed Cylinder Installation |
I got all the components to the front brake system and the wheels in. To my complete expectation (surprise) it all fits together and works! 1977 F forks, 1980 F front dual brakes and rotors, 1979 F front wheel, 1981 American K drum brakes, 1979-81 RC01 German K back wheel. Being from two different countries, the wheels are a perfect matched set. I will be stripping them and then sending them out for satin black power coating along with the drum cover. The only adjustment I need to make is that the calipers don't sit at the right distance to the rotor. The 1977 F front end is narrower so it makes the calipers too far out when mounted in the 1981 K triple tree. All I need to do is add some shims in between the fork mount and the caliper. I can either leave those in or make a single piece rectangular spacer; haven't decided yet but a win regardless. What was NOT a win was finding a brass plug in the side of the gas tank...
 |
| Modified Tank w/ Brass Plug |
 |
| Hookie Co. Black Swan 1981 CB750K |
The look i'm going for is a semi-polished raw steel tank, soooo... that puts a damper in that; literally. My options are: "Leave it! It adds character!", paint it, coat it or cover it with a decal. The plug is professional done and perfectly smooth and blended. I'm leaning towards the third option as I might be able to brushed nickel coat it to mimic the look of raw steel while also adding some damage and rust resistance. Black looks cool too. I'm going to finish sanding off the paint and see if there are any other blemishes before I make a decision. We also grinded off the side cover mounts from the tank as well. Still a funky looking tank without the side covers but I might paint the bottom black in a way that makes the tank look "stand-alone". In the picture to the right Hookie Co. did something similar that hides the part of the tank that dips in the back to meet the side cover keeping the sight line at the top of the frame.
Won't be much getting done on the bike for the next couple months, just sad staring at it while in a sling... Next steps are finishing up the engine rebuild, focusing on the cylinder head then getting the frame cleaned, welded and painted. To do the frame I have to get in the seat and cowl i'm looking at; they are needed for fitment on the new hoop and mounts. I might get into custom seat and cowl fabricating in the future (already planning out a BMW build) but for this bike I've found exactly what i'm looking for in purchased parts.
Until then,
Auf Wiedersehen!


I think it’ll look best raw. Like you said, depending on the decal you choose, it could cover the plug. You could always have it sprayed to mimic raw metal.
ReplyDeleteDecisions, decisions. The best part is, the way you choose will be the correct way.