Posts

Project LETHE - 1988 BMW R100 Cafe Racer

Image
Project LETHE - 1988 BMW R100 Cafe Racer Named after Greek Mythology's river Lethe; the place where those reborn can drink from to forget their past life; just as this old Touring bike will embrace its new life as a Cafe Racer.   Donor Bike : 1988 BMW R100 Frame : Stripped, cleaned and powder coated Body : Refinished tank, seat and subframe from Walzwerk, hidden battery box under swing arm Motor : Complete rebuild for engine and carbs, modified airbox Exhaust : MCU split headers, Sport-Evolution exhaust kit, HAT TECH muffler Brakes : Front full brake rebuild, stock rear drum brake Controls: ABM raceClips, Brembo Brake, Domino Clutch, Walzwerk throttle, Highsider mirror, Biltwell grips Wheels : Powder coated stock wheels, Michelin road classic tires (110/80-18 front, 130/80-18 rear) Front Suspension : Shaved fork legs, lowered (3in) Rear Suspension : YSS Topline 410mm Electronics : M.unit blue controller, Firepower feather weight battery, M.blaze disc and Highsider turn signals...

NORMA JEAN - 1981 Honda CB750k Cafe Racer

Image
1981 Honda CB750k Cafe Racer "Honda's Stock Cafe Racer" Named after Marilyn Monroe's (Norma Jean is her real name) beauty mark, shared by this bike in the form of a brass plug manufacturing defect in the tank.   Donor Bike : 1981 Honda CB750k Frame : Stripped and cleaned, rear hoop Body : Modified tank, Hawk seat and cowl from Hookie Co, under seat electronics tray, hidden battery box under swing arm, EU sport kit rear sets and control upgrade for foot controls Motor : Complete rebuild for engine and carbs, carbs rejetted for POD filters Exhaust : MAC headers and Spark Performance muffler Brakes : Front dual disc brake upgrade, stock rear drum brake Wheels : EU Comstar rims, Shinko E270 tires (4x19 front, 4.5x18 rear) Front Suspension : 1978 CB750F Forks, widened (192mm) and lowered (3in) Rear Suspension : 330mm YSS Eco-Line, lowered (5mm) Electronics : M.unit blue controller, Rick's reg/rec, Antigravity 12-cell battery, M.blaze disc and pin turn signal...

Finishing the Bike

Image
To explain the Acewell speedo cable "hack" I needed to convert the hall sensor signal into a consistent digital output.  The hall sensor creates a small signal blip on every revolution, which is inconsistent in length and amplitude, but consistent in time.  This is incompatible with the Motoscope Tiny, which they tell you directly in the manual.  I needed to add a feature that I assume is built into the Acewell gauges that make them work, which is something called a Schmitt Trigger (oooo science).  The Schmitt Trigger detects that inconsistent signal blip and converts it into a signal output that is consistent in length and amplitude.  I found this awesome and crazy smart Swiss dude named  Jörg Hau that makes Schmitt Trigger modules specifically for Acewell hall sensors connecting to various motorcycle gauges, along with a bunch of other cool motorcycle (and non motorcycle) gadgets.  The connection was inline-ish, simple and hidden away under the...

Carburetor and Wiring Pt. 2

Image
I researched what size jets I should be running with POD filters and a 4into1 exhaust.  I came across a great channel on YouTube called TheMotorcycleMD .  He specializes in vintage Hondas and has an awesome array of service videos.  In one of them he addresses how to tune the carbs when running POD filters and happens to mention the jets and setup for carburetors on a 1981 CB750K (thats what I have!).  You only need to open up the primary and secondary main jets.  The primary goes from stock 68 to 80 and the secondary goes from stock 102 to 116 (the closest one I could find is 118).  I got these from Randakks as well.   Jumped into the totally-not-panic-inducing carburetor rebuild.  I separated the bodies and disassembled each carb, making sure to cleanly organize each one.  I broke them down until every metal piece was free of any rubber/o-ring.  One carb at a time I dipped all the metal components into a carb cleaning dip for ...

Finished Engine and Wiring

Image
Finally got around to finishing up the engine.  Used a feeler gauge to measure the gap between the cams and the shims.  Ordered a valve shim tool to push the buckets down.  Used my wife's tweezers to pick out the shims.  Measured them with some calipers to compare them to the spec, which is .06 - .13mm.  You annoyingly have to put them all back in to keep measuring them so the cams dont damage the buckets.  Putting them back is NOT as casual and fun as the online videos make it look... The shims are a pretty tight fit so they kept sliding past the buckets instead of seating.  There was only 1 out of 16 shims that was barely in spec, but none of them were shockingly out of spec  indicating something scary, just normal wear for a 40 yr old engine. I went ahead replaced all 16 shims to land mid spec around .09mm.  To calculate each shim size you subtract your desired gap (.09mm) from your measured gap, add that to the measured shim and then ro...

Exhaust and Front Brakes

Image
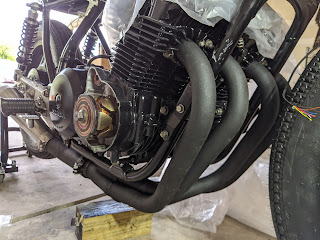
  DHL/USPS finally found my parts!  I had been waiting for over two months, so obviously I was stoked to get them.  I was working on valve shim adjustment and carb tuning when they showed up and immediately got pushed to the front of the line.  I went with MAC headers and an Italian made Spark Performance muffler.  This combo seemed to be the go-to for high end CB750 cafe builds.  The headers were a little hard to find as all of their distributors were out of stock, maybe due to COVID supply chain issues, but I was able to find a full exhaust set on eBay.  I cut the included muffler off of the link pipe.  I'll just sell the MAC muffler that came with it. As you can maybe tell from the scratched up frame, installing the headers wasn't as simple as I had hoped.  The MAC installation instructions told me to use the wrong exhaust clips that pushed the exhaust flanges into the frame.  Welp, this is why I chose to paint it; "easy" t...